How to book a lab test, record results and handle critical values
A lab test goes from the booking desk to a validated report in a few clear steps: book and price it, take payment, collect the sample, receive it in the lab, enter the results, answer any critical value and validate. This guide walks that path with one patient, and ends with the part only the clinical lead does once: setting the critical limits that make a dangerous result raise an alert.
Who it is forLab technician and clinical leadTime20 minutesProductHMSLevelIntermediate
Before you start
Steps
1
Book the test at its catalogue price
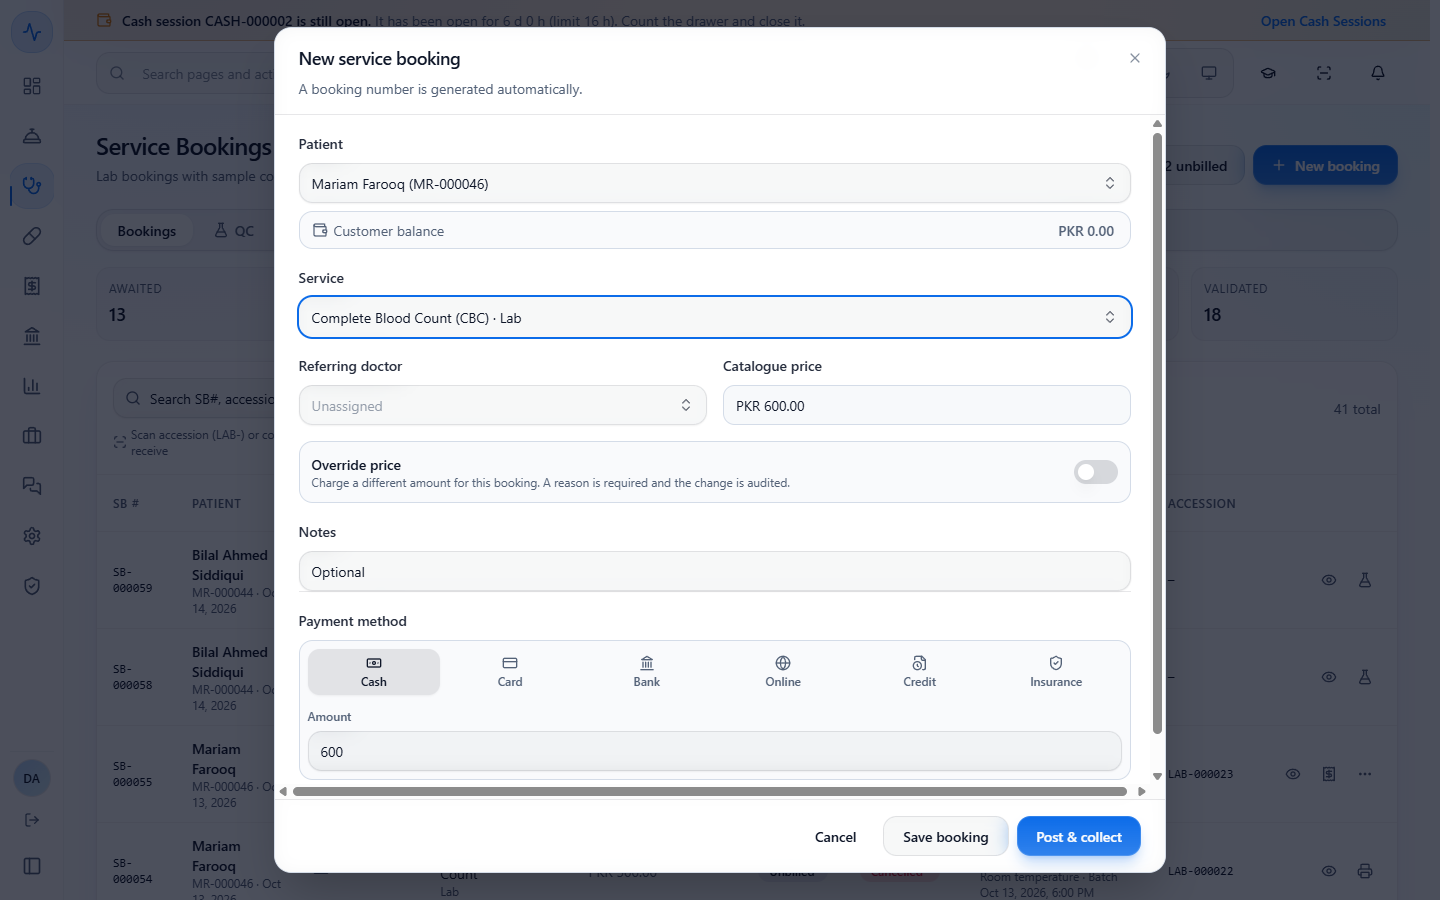
Click New booking. Choose the Patient (Mariam Farooq, MR-000046) and the Service (Complete Blood Count (CBC)). The Catalogue price shows PKR 600.00. To charge a different amount, switch on Override price, enter the Rate (override) and write a Reason for override of at least five characters, for example "Staff discount approved by the lab manager".
New service booking with Mariam Farooq, Complete Blood Count (CBC) and the catalogue price PKR 600.00
2
Take payment now, or save the booking for later
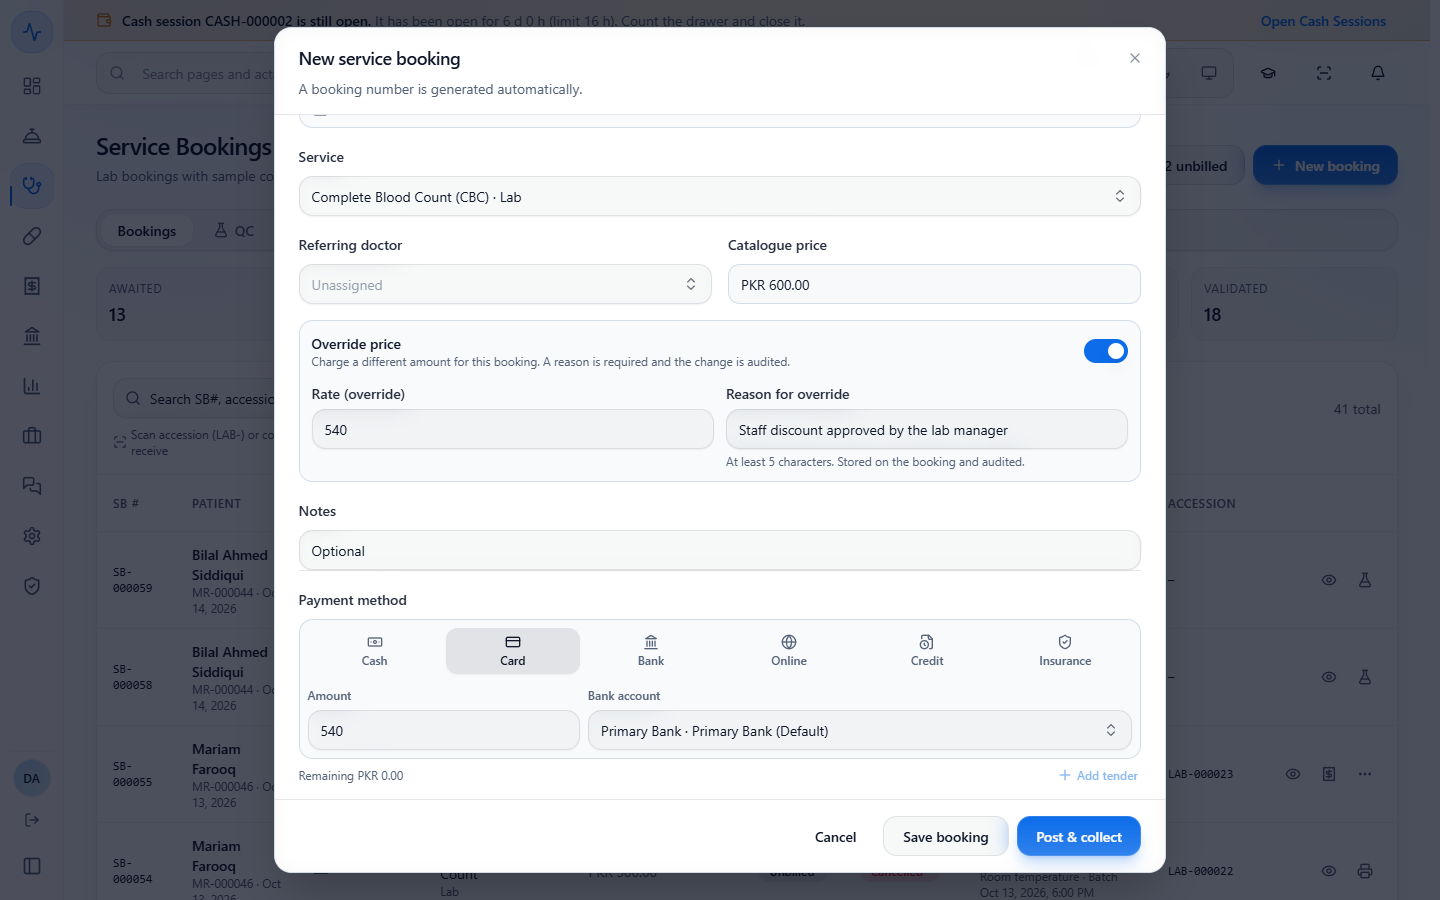
Choose the Payment method: Cash, Card, Bank, Online, Credit or Insurance. Card, Bank and Online also ask for the Bank account (Primary Bank). Press Post & collect to take the money and print the receipt, or Save booking to leave the booking unbilled and Bill it later from the booking sheet.
Payment method buttons with Card selected and Primary Bank as the bank account
3
Collect the sample and check the wristband
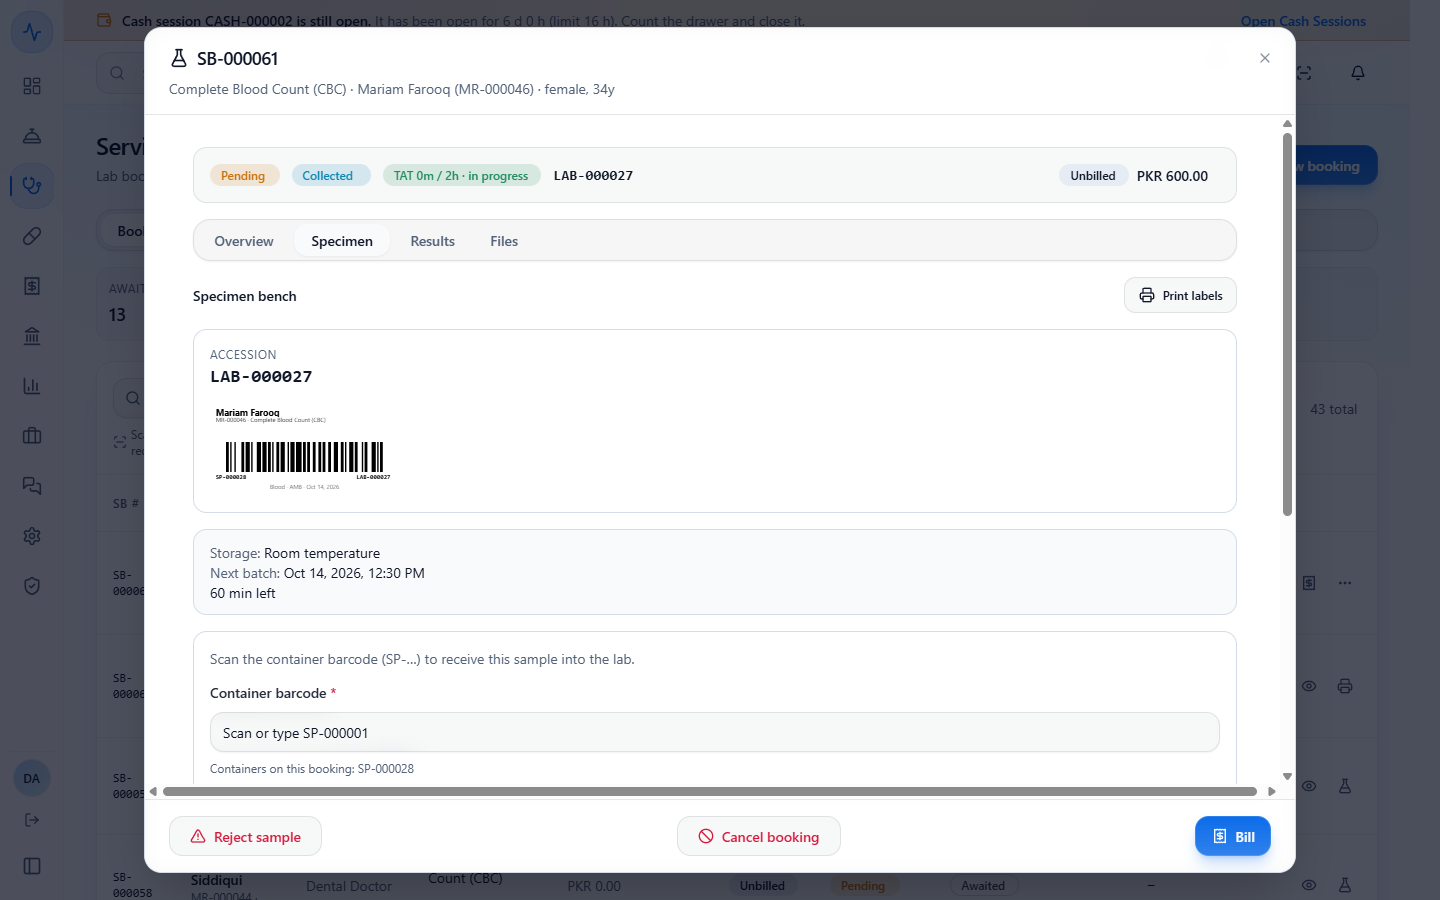
Open the booking, then the Specimen tab. Choose the Sample type (Blood). Scan the patient's wristband, or type the MR number, in Wristband, then press Collect sample. A wrong patient shows "Wristband does not match this patient — collection blocked". The right patient gets an accession number (LAB-000027) and a container barcode (SP-000028), and the label appears.
Specimen bench after collection with accession LAB-000027, the label for container SP-000028 and 60 minutes left
4
Receive the tube in the lab
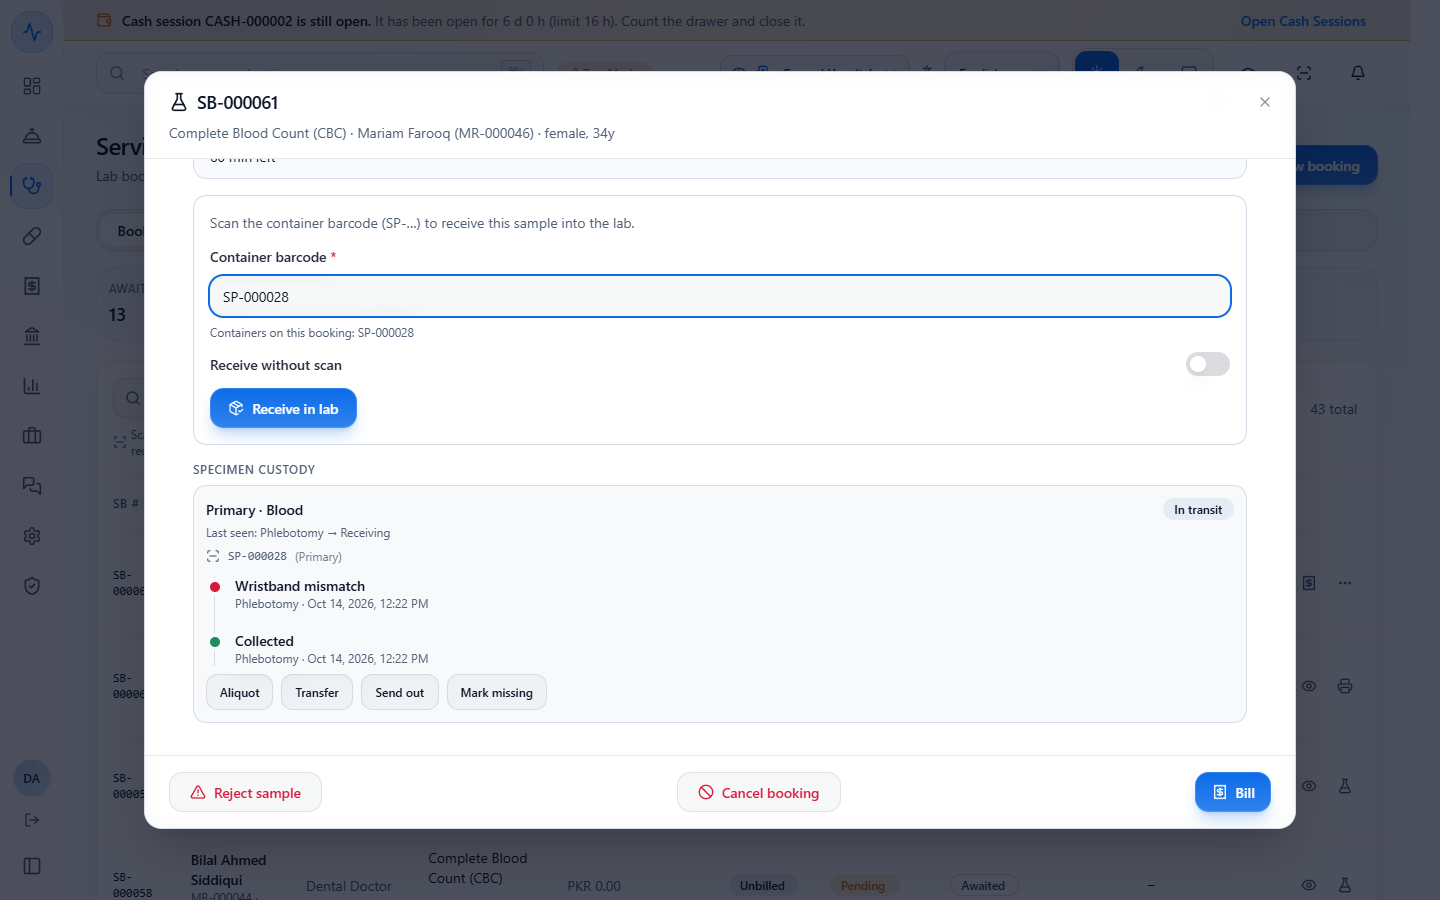
In the lab, scan the tube's container barcode into Container barcode and press Receive in lab. The toast says "Sample received in lab" and the status becomes Received. If the label cannot be scanned, switch on Receive without scan and write why; the reason is recorded in the timeline.
Receive in lab with the container barcode SP-000028 typed and the specimen custody timeline below
5
Enter the results and read the flags
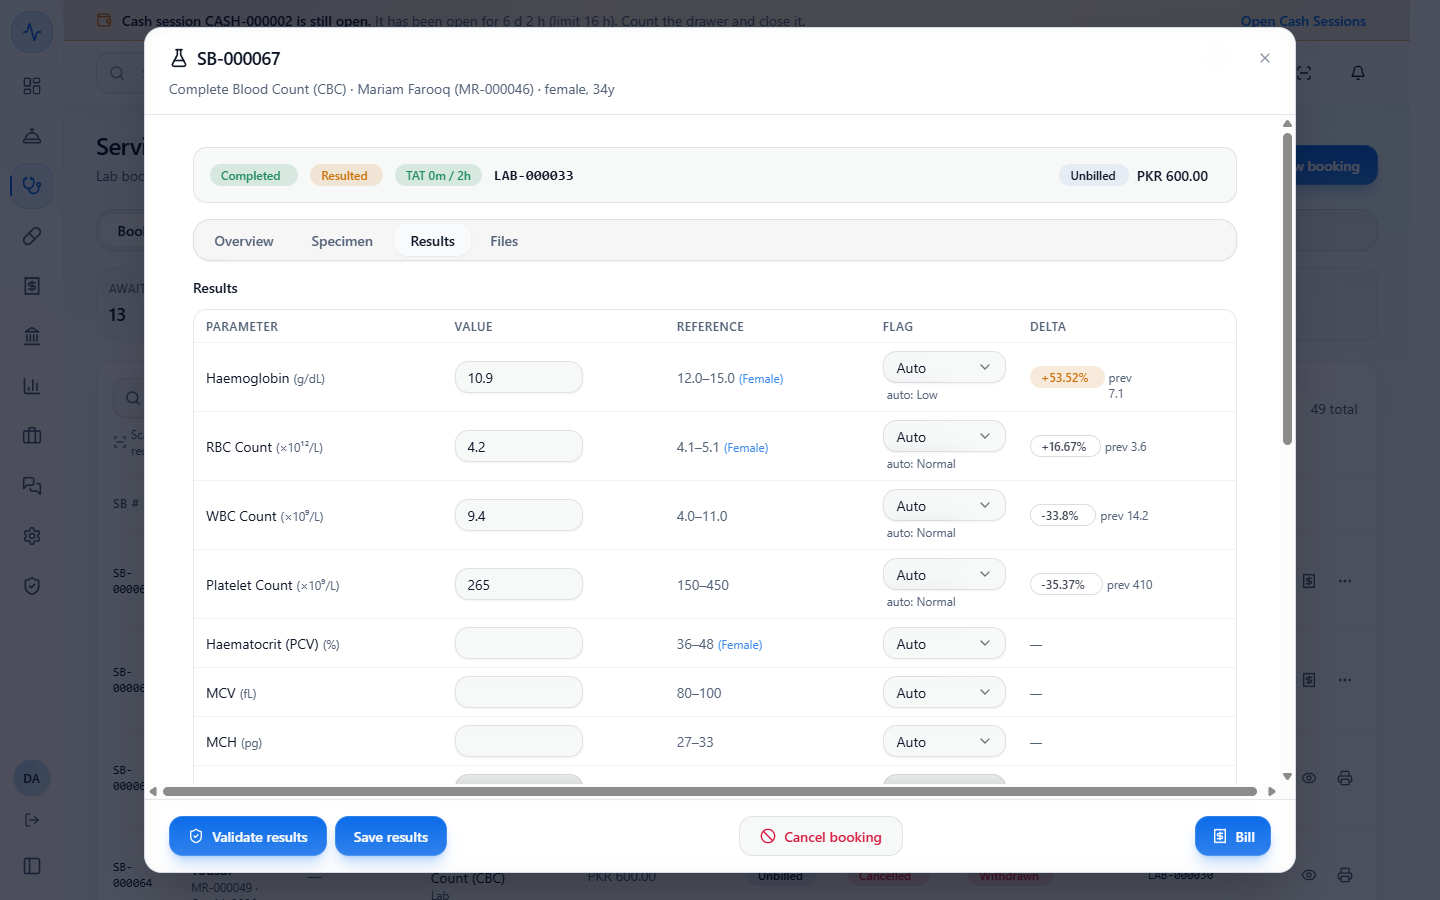
Open the Results tab and press Start processing. Type each value, then press Save results. The Flag stays on Auto and shows the flag it worked out under the selector (for example "auto: Low"), from the reference range for the patient's sex. The Delta shows the change from the patient's previous validated value, for example +53.52% against 7.1.
Results table with haemoglobin 10.9 on Auto, the computed flag Low under it and the delta +53.52 percent against the previous 7.1
6
Set critical limits for a lab test (clinical lead): find what is missing
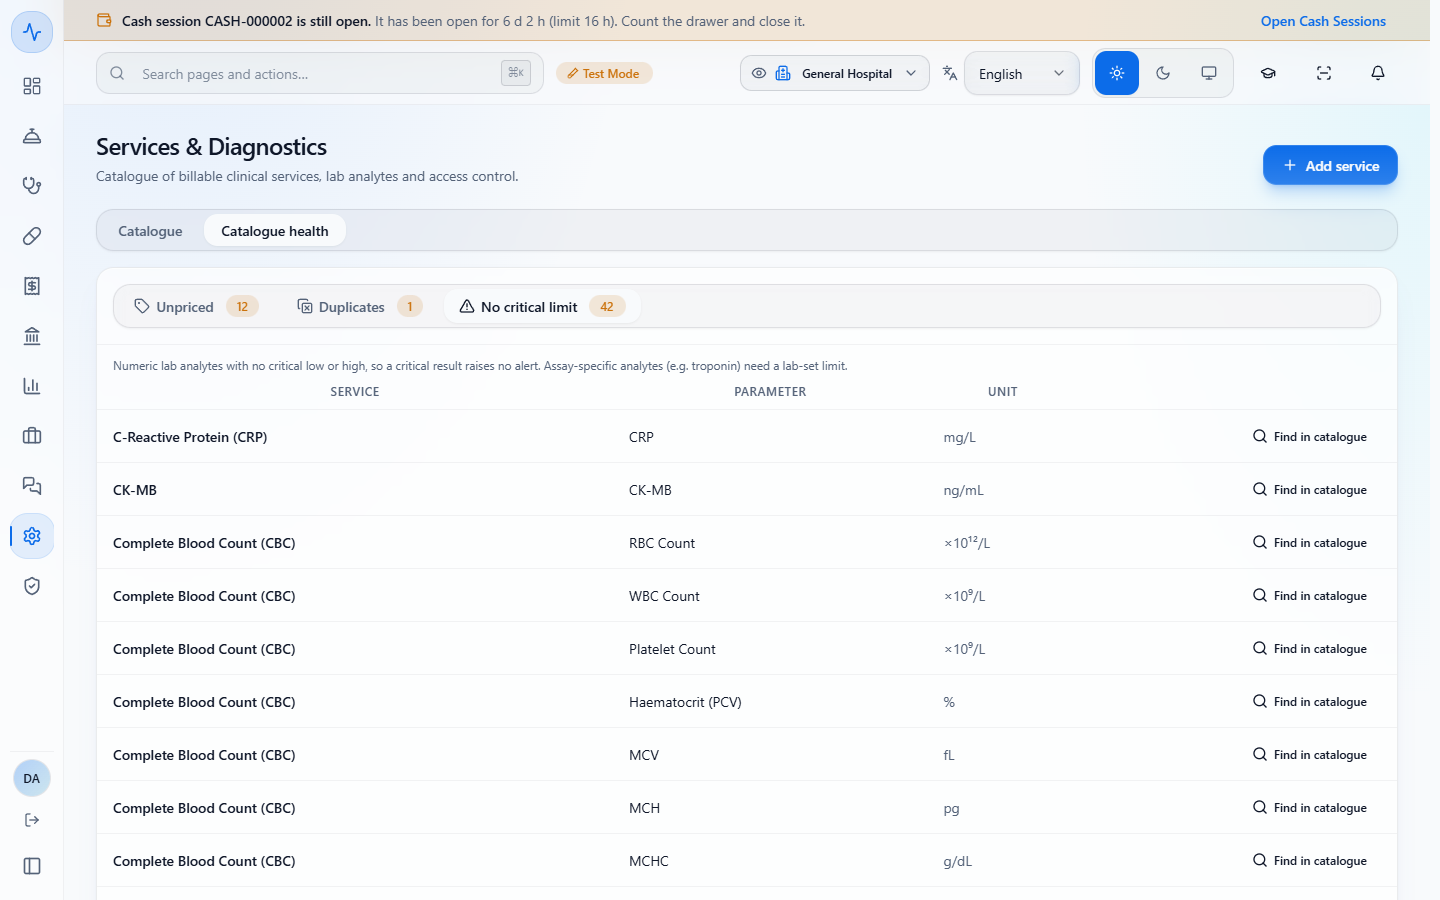
A result is only flagged Critical when its parameter has a critical limit. Open Administration › Master Data › Services, then the Catalogue health tab and No critical limit. It lists every numeric analyte without a limit (42 here). Press Find in catalogue on the row you want, then open the test's parameters.
Catalogue health list of analytes with no critical limit, with Find in catalogue on each row
7
Enter or correct the critical limits
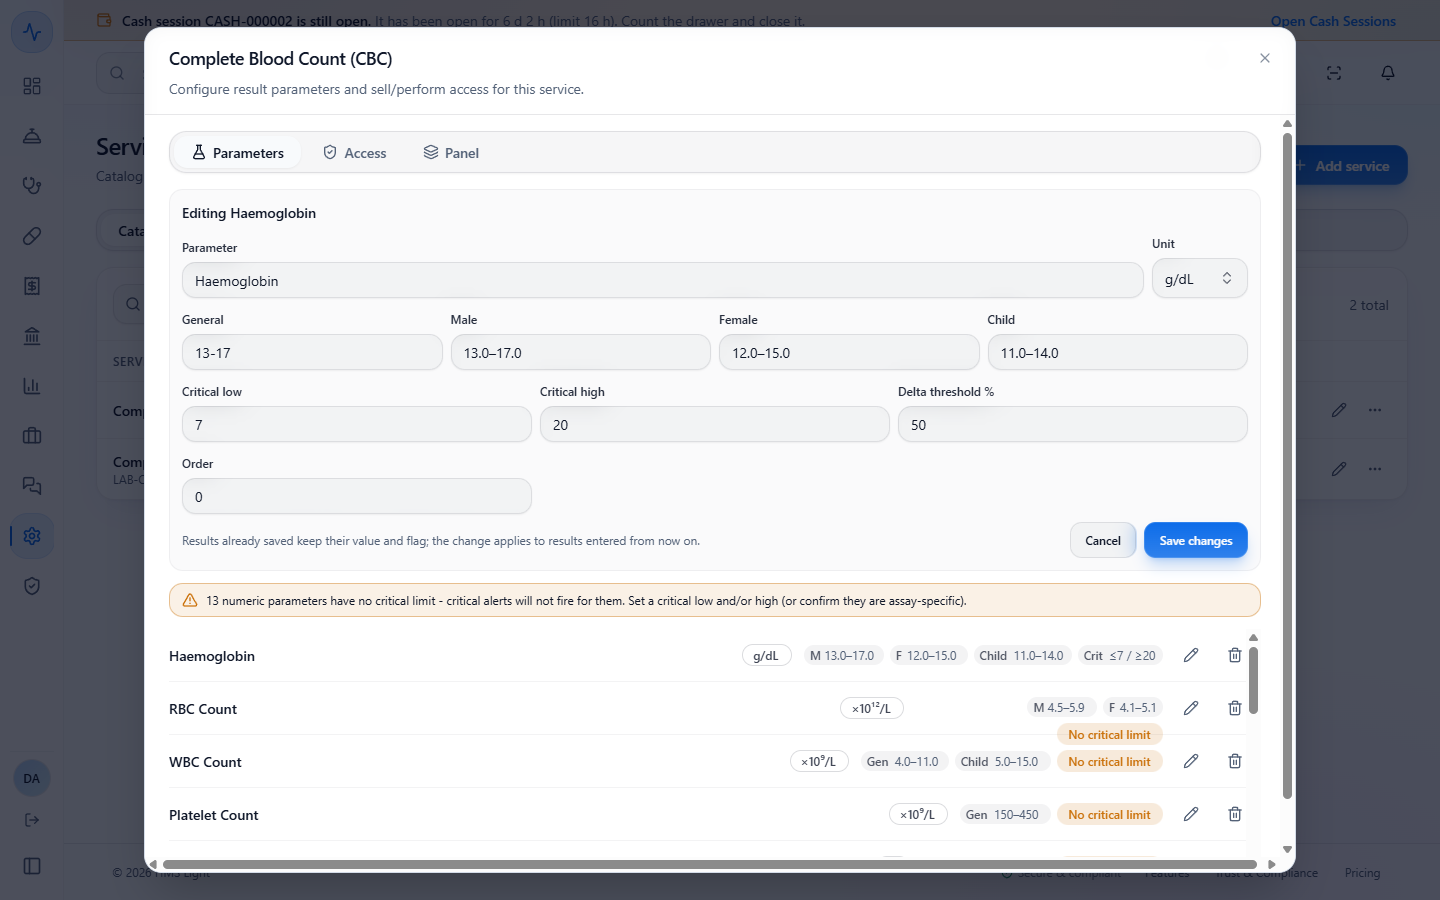
On the Parameters tab, press the pencil (Edit parameter) on the row, for example Haemoglobin. The form opens filled with the saved values. Enter Critical low 7 and Critical high 20, then press Save changes. The toast says "Parameter updated" and the row shows "Crit ≤7 / ≥20". For a new parameter, use the form at the top and press Add. Your clinical lead can come back later and correct a limit the same way.
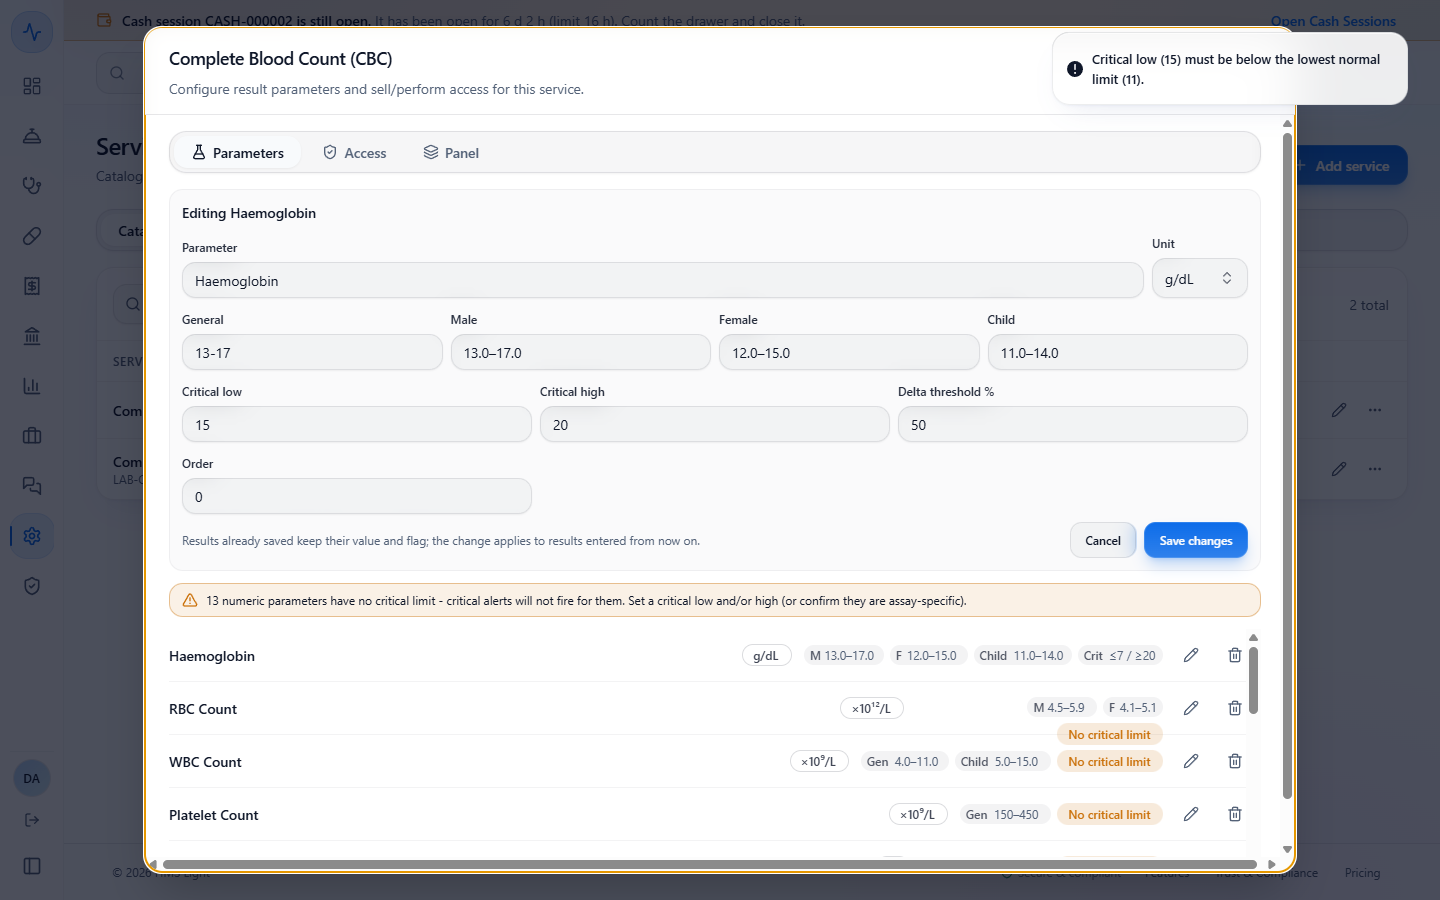
A limit that makes no sense is refused: "Critical low (15) must be below the lowest normal limit (11)."
Editing Haemoglobin with Critical low 7 and Critical high 20 filled in
A critical low of 15 refused with the message that it must be below the lowest normal limit
8
Answer a critical value, or correct a typing mistake
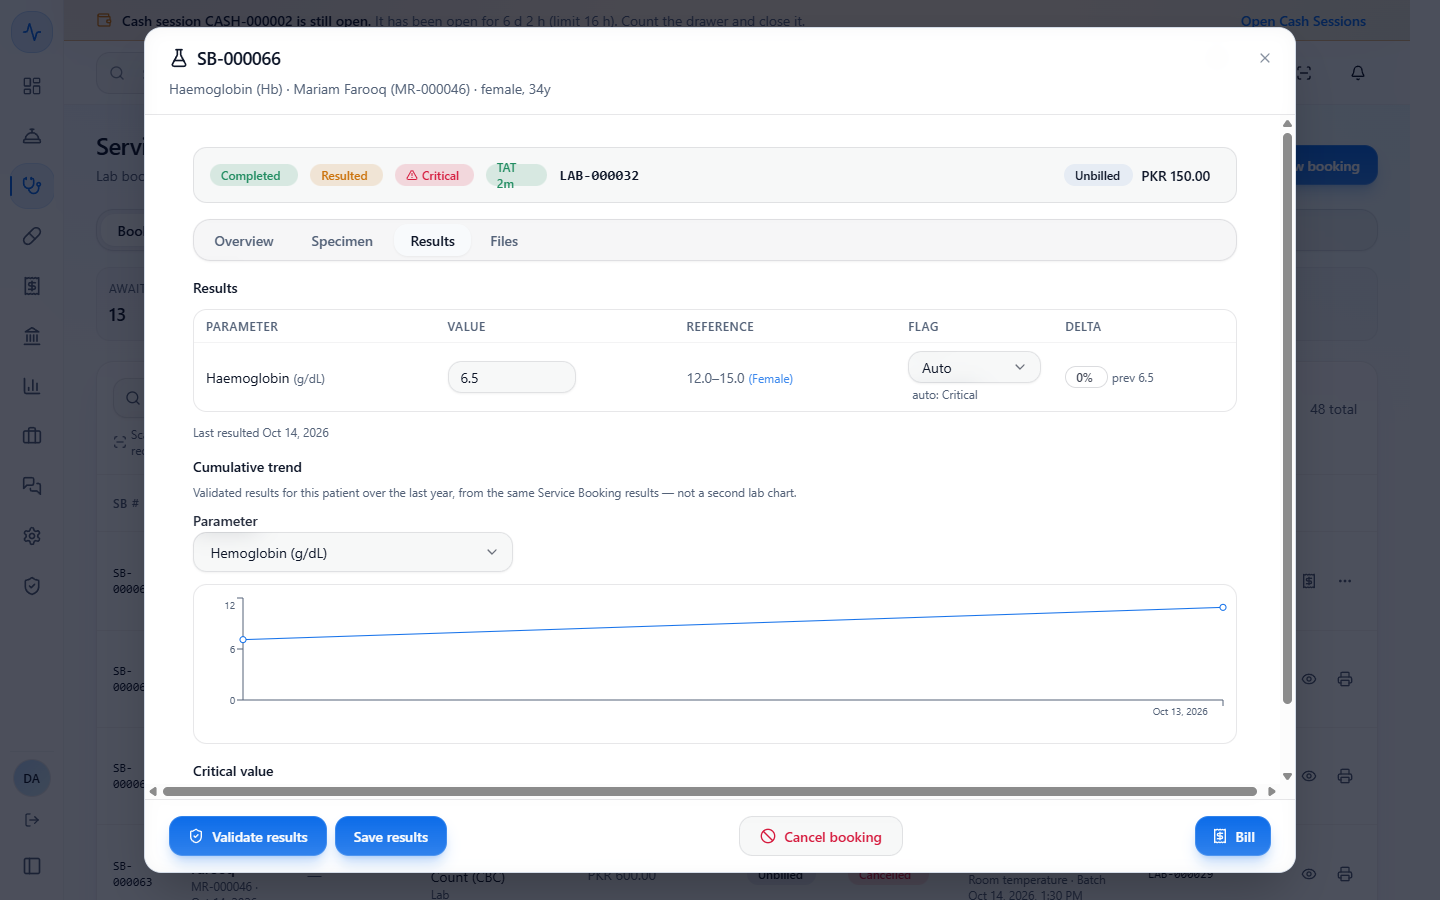
With the limits in place, a haemoglobin of 7.1 is only Low, but 6.5 is Critical. The header and the row show Critical, and the booking appears under the Criticals tab. Phone the doctor, then press Acknowledge read-back, type who received it (Dental Doctor, by phone) and confirm. The row then reads "Read-back".
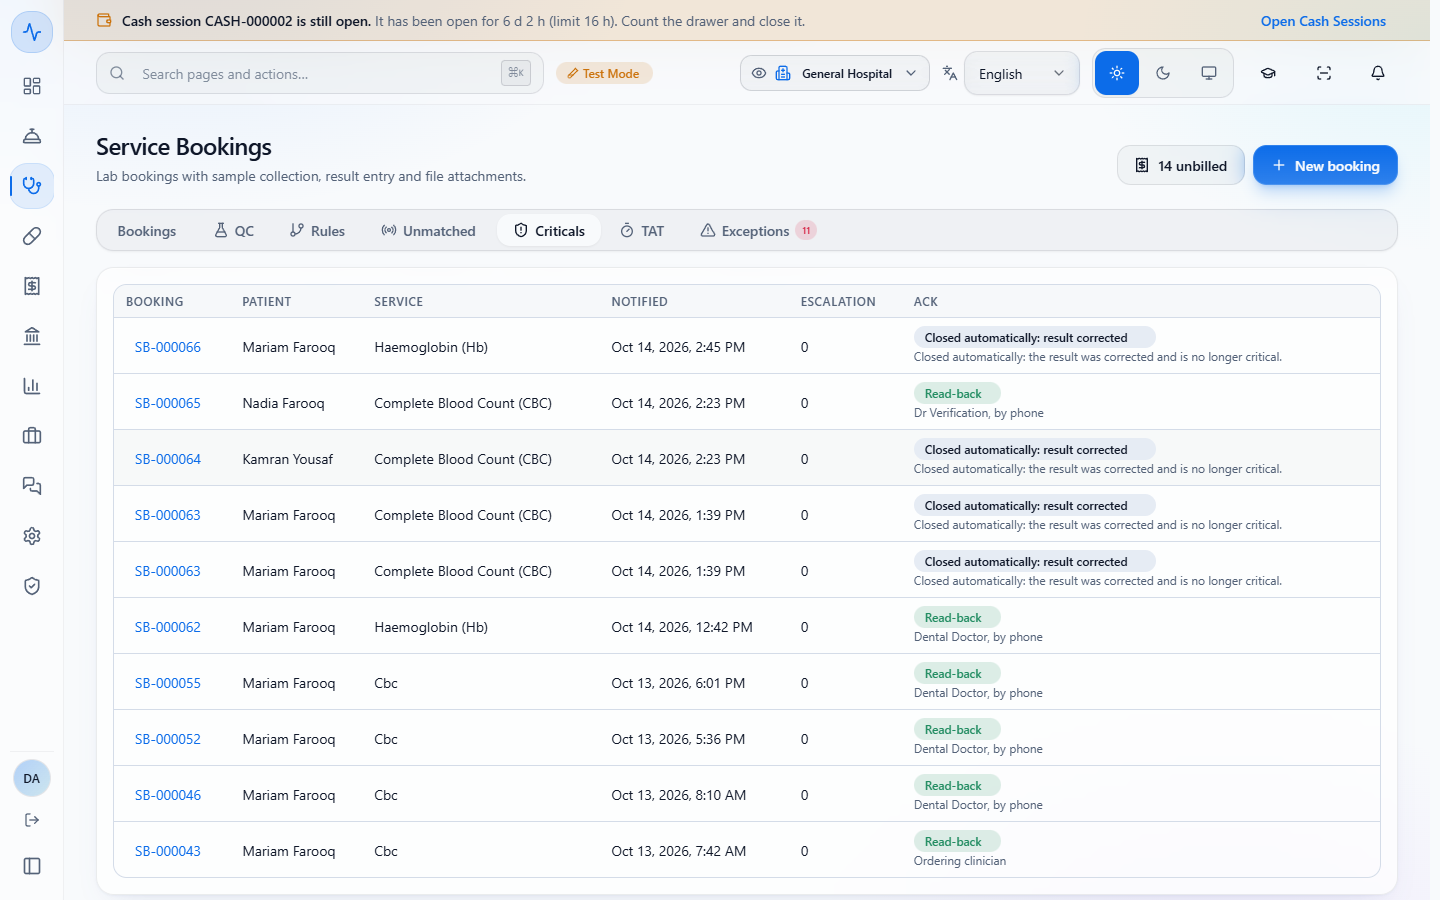
If the value was a typing mistake, correct it (for example 13.5) and press Save results. The flag becomes "auto: Normal", the Critical badge goes, and the alert on the Criticals tab reads "Closed automatically: result corrected", with no button.
Haemoglobin 6.5 flagged Critical with Auto showing auto: Critical
Criticals tab with the alert closed automatically after the result was corrected
9
Validate the report
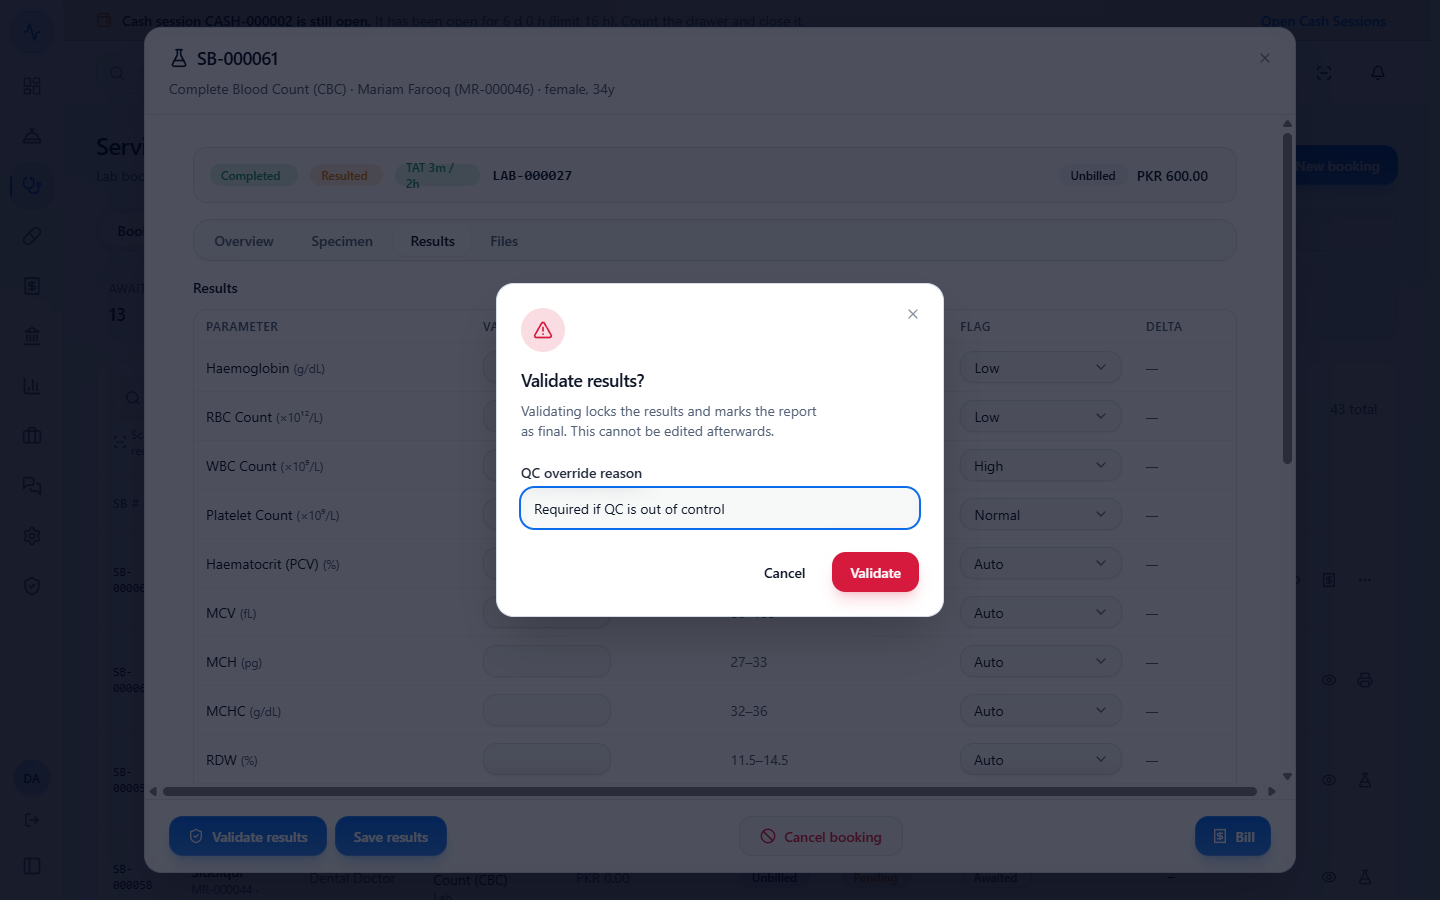
Press Validate results and confirm. Validating locks the results and marks the report as final; it cannot be edited afterwards. If quality control is out of control, you must give a QC override reason. If your hospital requires billing before release and the booking is unbilled, you see "This result cannot be released until the booking is billed". Bill it first.
Validate results confirmation with the QC override reason box
10
Cancel a billed booking when it was a mistake
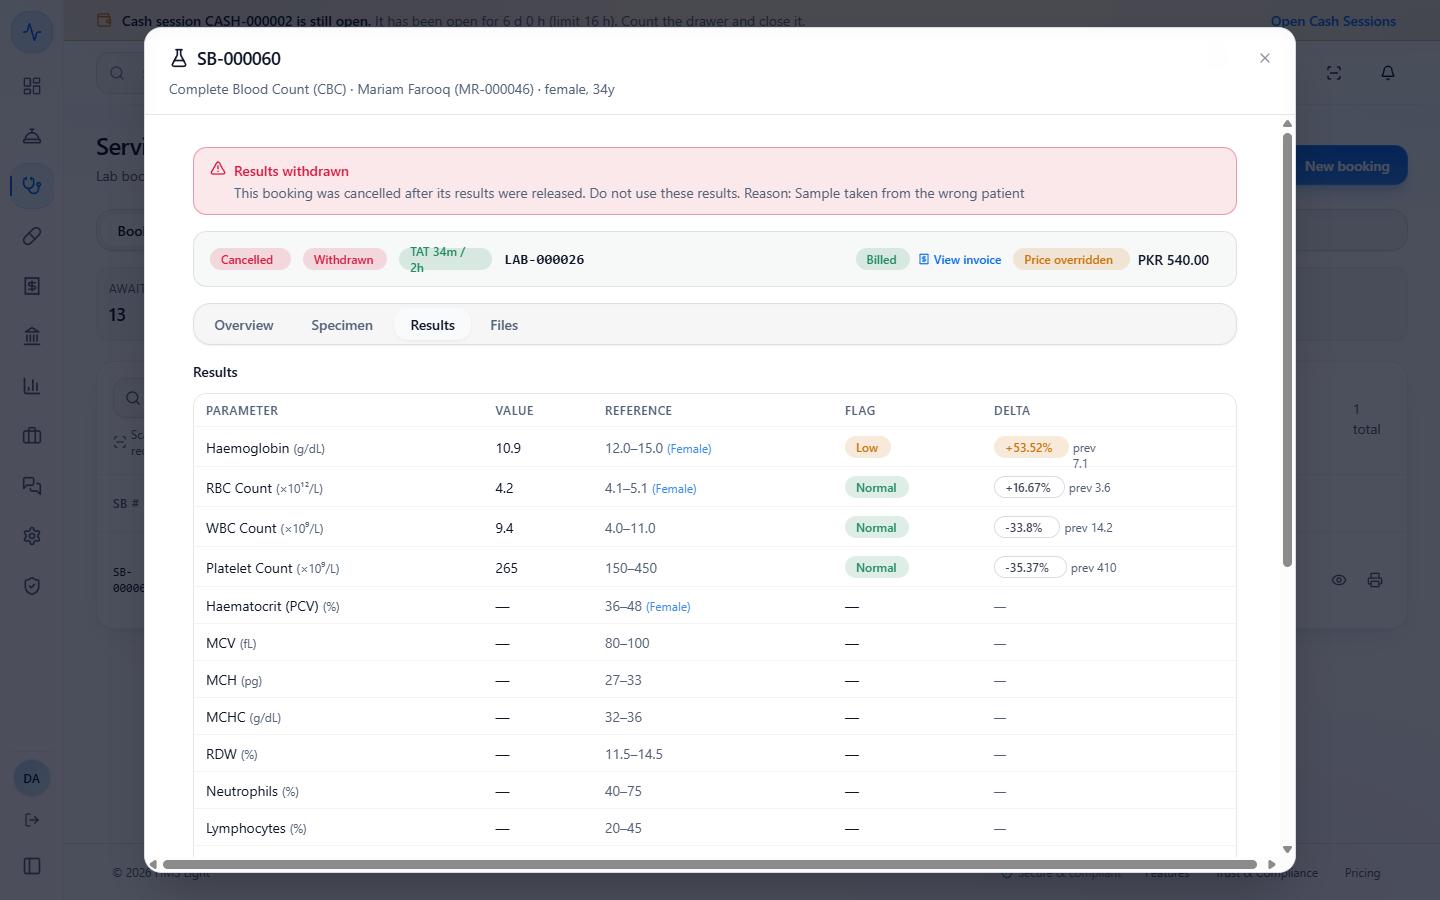
Press Cancel booking on the booking sheet and write the Reason for cancelling (Sample taken from the wrong patient). If the results were already released they are withdrawn, and the banner says "Do not use these results". The invoice is cancelled, the income is reversed and the card payment is refunded.
Cancelled booking showing Results withdrawn and the reason
Check it worked
The booking shows Validated, with the flags and deltas you saw, and Billed with a View invoice link.
A critical result appears under Criticals with "Read-back" and the name you typed.
A cancelled booking shows Cancelled and Withdrawn; its invoice shows a reversal and a refund voucher in the ledger.
On the Parameters tab, a parameter with limits shows a "Crit ≤7 / ≥20" badge instead of "No critical limit".
A critical result you corrected to normal shows "Closed automatically: result corrected" on the Criticals tab.
Common mistakes
Mistake
What you see
Fix
Wrong wristband scanned
"Wristband does not match this patient — collection blocked"
Scan the right patient's wristband or MR number
Reason shorter than five characters
"Enter a reason of at least 5 characters."
Write a clear reason
Typed a wrong value
The row shows Critical or Low
Correct the value and save; with Auto the flag and the critical alert follow the new value
Validating an unbilled booking with billing-before-release on
"This result cannot be released until the booking is billed…"
Press Bill and take payment, then validate
Parameter with no critical limits
A dangerous value shows only as Low
Press Edit parameter and enter Critical low and Critical high (clinical lead)
Critical low above the lowest normal limit
"Critical low (15) must be below the lowest normal limit (11)."
Enter a critical low below the normal range
Quick reference
Item
Meaning / rule
Accession (LAB-)
The lab number given when the sample is collected
Container barcode (SP-)
The tube's own barcode, scanned to receive it
Flag
Auto (shows the computed flag under it), Normal, Low, High or Critical
Delta
Change from the previous validated result
Critical low / high
Values below or above which a result is Critical; set per parameter, can be corrected later with Edit
Read-back
Who received a critical result, recorded with time
Validate
Locks the report as final
Withdrawn
Released results of a cancelled booking, not to be used
Frequently asked questions
What if a dangerous value shows only as Low? The parameter has no critical limits. Press Edit parameter and enter Critical low and Critical high (the clinical lead does this).
Can I validate a booking that has not been billed? Not when billing-before-release is on: "This result cannot be released until the booking is billed…". Press Bill, take payment, then validate.
What if I typed a wrong result value? Correct the value and save. With Auto, the flag and the critical alert follow the new value, and a critical result corrected to normal shows "Closed automatically: result corrected" on the Criticals tab.